Gotchas - Bulkheads
- Details
- Written by Kevin Horton
- Hits: 7706
I'm not sure what date to record this item under - it includes info from several different months, but it makes sense to record it in sequence with the fuselage jig.
Gotcha's
1. F-887 Upper Longeron - I found that I had to move the F-811 & F-812 bulkheads aft later because they didn't match up with the holes in the F-824 Aft Side Skins. This meant that I had to extend the notches in the F-887 Upper Longerons where they interfere with the F-811. This was a royal pain in the butt, as it would have been a lot of work to extract the longerons from the jig at that point.
I advise you to hold off making the notches in the longerons until you can hold the F-824 up along side the aft fuselage to confirm the location of the F-811 & F-812.
2. F-804H - The F-804H is the 0.063 plate that joins the two halves of the F-804 bulkhead. It butts up against the bottom of the F-887 Upper Longeron. One of my F-804Hs was perhaps a bit too long, and was very tight against the longeron. At some point during the fuselage assembly, the upper edge of the F-804H slipped outboard, allowing the F-887 to move very slightly down, and the top edge of the F-804H was caught on the corner of the F-887. Once the edges were caught, it was not possible to slip the F-804H back into the correct position, and it pushed the F-820 and F-823 skins outboard. I didn't discover the problem until I was fitting the canopy. I had to remove a bunch of rivets to I could peel the fuselage open and file the top of the F-804H so I could get rid of the interference with the F-887 longeron.
I advise builders to not butt the F-804H tight against the F-887. Allow a small amount of clearance, and keep an eye on this area during the construction to ensure the F-804H remains in the correct position. It also would have helped to put more of a curl in the F-804H, as that would force the top to sit tight against the rest of the F-804 instead of moving outboard.
F804 Bulkhead Spacer
- Details
- Written by Kevin Horton
- Hits: 3467
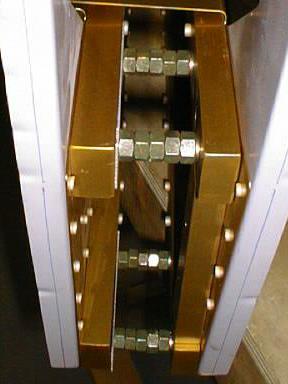 Here you see the nuts, washer and spacer that I used to make a temporary spacer. My original plan was to use particle board, as suggested by Vans. I couldn't find the right thickness, so I tried layers of medium density fibreboard and plywood, plus a thin piece of aluminum. This gave the thickness I wanted, but I found that when I torqued the bolts to hold everything snugly together that it crushed the spacer a bit, and the two parts of the bulkhead were too close together. My wing spar wouldn't have fit.
I ended up sliding 5/16" nuts, plus one washer, plus a 0.040 aluminum spacer over the 1/4 bolts. That gave me a spacing about 0.003 more than the wing spar thickness. Note: commercial nuts are not all the same thickness, so please measure things if you want to do your spacer this way.
Bulkheads in the Jig
- Details
- Written by Kevin Horton
- Hits: 3717
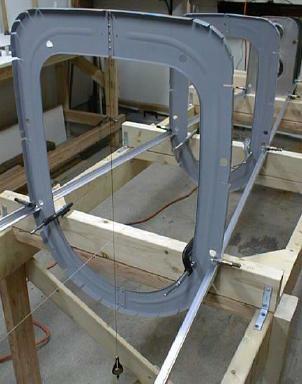 Each bulkhead is clamped to one of the lateral 2x4s. A string is run end to end down the centreline of the jig. Each bulkhead is aligned using a plumb bob to make sure it is not twisted, and it is positioned laterally by making sure that the plumb bob line just touches the centreline. The vertical position is set by measuring the height of the top of bulkhead from the 2x4.
Read on for more.
Fuselage Jig
- Details
- Written by Kevin Horton
- Hits: 4196
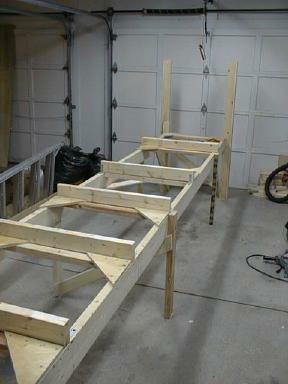 The fuselage is built upside down in a jig.
The jig is a massive structure, apparently designed to withstand earthquakes. The side rails are 16 ft long 2x6, with 2x4 cross members. 2x4s on edge are fastened to the top. The position and height of these 2x4s is critical because they determine the location of the fuselage bulkheads. The main fuselage longerons rest on these 2x4s, so I carefully shimmed them to make the tops of the cross members all in the same plane, using taut lengths of dental floss as a reference to measure from.
The firewall will be bolted to the two uprights at the end of the jig.
Read on for more.
Finished riveting the wing skins!
- Details
- Written by Kevin Horton
- Hits: 3933
I finished riveting the lower wing skins tonight! I've still got a few small odds and ends to do on the wings, but they are basically done except for installing the wing tips. I'll do those at the end of the project, because I want to do all the fibreglas work at the same time.
Tomorrow I'll rivet on the right flap hinge (I did the left one tonight) and install the anchor nuts for the access covers on the lower wing skin. I've also got to install the anchor nuts where the outboard end of the fuel tanks attach to the outboard leading edge.Riveting the RH lower wing skins.
Starting to rivet the lower wing skins
- Details
- Written by Kevin Horton
- Hits: 3899
Progress was slow for awhile due too much time on the road, but I finally am making headway again. In Canada, we have to get an official inspection done prior to closing any major components. These inspections cost a fair bit of money, so I elected to get the tail and wings done at the same time. I finally finished all the details and had the big inspection done on 24 November 1999. The inspector, Dale Lamport, was quite thorough, but he gave it all a clean bill of health at the end, except for one rivet that he wanted me to redo.
 So, I can now rivet the lower wing skins on. I started the right wing today. The most inboard part was a real pain to do because there are four ribs in nine inches to support the area where the wing walk is. You have to get one arm in through the lightening holes and between the ribs to get a bucking bar on each rivet. My right arm will be sore for days, but I managed to get all the rivets OK.
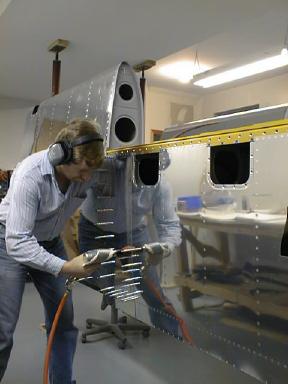
Here you see me working in the middle of the right wing, with my left arm stuck into the wing through an access cover, holding a bucking bar. The rivet gun has a paper towel "diaper" duct taped to it to keep it from spitting oil onto my work. It sure is nice to be getting to the end of these wings :-)
