To Do List
- Details
- Written by Kevin Horton
- Hits: 9977
The depressingly long list, like everything else, is a work in progress. I know there are some items I left off, as it was put together very quickly. Some items won't take long at all, some of them represent many days or weeks of work:
I'll update this list as I go. Updated on 11 Feb 07.
- Cockpit
Instrument PanelEFIS remote heading sourceDesign installationPurchase materialFabricateand install tray - fabricated on 7 Mar 04. Still have to prime and install.Run wires- completed 14 Mar 04Move CDI up below EFISFile cutout for course knob- completed 23 Jan 04purchase blanking plate for old CDI location- arrived in early Feb 04Warning and Caution LightsPurchaseInstallInstall dimmer controlIntercomHave avionics shop extend rear seat mike plugs- completed in early Feb 04Install harnessWire PTT switchesCheckout harnessFabricate support for end of avionics trays- completed 23 Jan 04Paint panelInstall fixed part of panelPurchase new panel and recut without removable portion- completed 02 Jan 05.Cigarette Lighter for power for handheld GPS, iPod, etc.PurchaseInstall- completed 19 Apr 05- Cockpit night lighting
LED flood lights- completed 25 Jan 04Goose neck map light- completed 8 Jan 04Dimmer control for Garmin GNS-430 & GTX-327- completed 21 Feb 04Dimmer control for engine instruments, CDI, etcRear seat light?- deferred until after first flightRear seat riserpurchase materialfabricate- Aileron trim
run wires- completed 22 Feb 04install servo- install mechanism from servo to stick (during flight test phase)
- Heating and ventilation
Heater controlsFront seat- completed 7 May 05Back seat- completes 7 May 05Fresh air ventsFront seatBack seat- Paint cockpit floor
- Cockpit sidewall insulation
- Cockpit storage pockets
- Design
- Purchase material
- Fabricate
- Install
- Firewall insulation
- Purchase
- Install
- Wiring
pitch trim wires to tail- completed 1 Feb 04landing and taxi light wiring - switches, wig-wag, etc- in-fuselage portion completed 28 Feb 04- fabricate and secure wire bundles
Forward fuselage- Forward of firewall
Under floor- Canopy
Remove masking tape residueRound edges of PlexiglasEnlarge holes in PlexiglasInspect for scratches and polish them out if requiredrivet canopy skirtlayer of FG over rivetsfill and sand canopy skirtpaint canopy skirt- completed 26 Sep 04Canopy latch- Windscreen
Trim at bottomdrill holesinstall- FG/carbon fibre around windscreen
PurchaseFabricateSand and Fill- Paint
- Install
- Engine Installation
- Engine cooling plenum
Purchase materialInstall- Seal to cowl at front
- Flexible Hoses
Pressure Test- Install - 95% complete
Oil Cooler Door ControlDesignFabricateInstallAlternator bracket- Secure various hoses, wire bundles, etc
Alternate airInstall doorinstall control- completed 10 Apr 05- Electronic ignition
Run power wiresMount coilsPut holes in baffle- Run ignition wires
- Set timing
- Magneto
- Run ignition wires
- Set timing
- Inverted Oil System
Tip Oil Valve back 15 degreesForward fuselage upper skin - rivet in placeForward baggage bay doorInstall lock mechanisminstall blocks that locking rods slide intorivet door interior- Fuel Tanks
Seal Access CoversLeak check- Fibreglas
- Fill and sand
Empennage tipsEmpennage fairingGear leg fairings- cowling - 95% complete
canopy skirtwheel pants- wing tips (after final assembly)
SpinnerGear leg to wheel pant fairingsGear leg to fuselage fairings- Close off multi page snag list
- Final assembly in Hangar
- Install wings
- flaps
- Install
- Check rigging
- ailerons
- Install
- Check rigging
- Run wires in wings
- Pitot heat
- Landing light
- Taxi light
- Coax for Nav antenna
- Coax for Com 2 antenna
- Strobe lights
- Position lights
- Install wing tip antennae
- Nav - antenna installation 90% complete
- Com 2 - antenna installation 90% complete
- Install wing tips - right tip mounted, left tip 75% complete (waiting for final assembly to check alignment of left tip to aileron)
- Install rudder and elevators
- Install fuel tanks
- run fuel gauge wires
- connect fuel lines
- Ground Tests
- Fuel flow test
- Ignition timing
- Electronic ignition
- magneto
- Engine runs
- Com radio check
- EFIS heading cal
- mag compass swing
- RV Flight Training
- Taxi tests
- brakes
- steering
- Admin items
Reserve registration marks- C-GNHK reserved- Certificate of registration
- Final inspection
- Airworthiness certificate
- Insurance
- Paint Aircraft
Goose Neck Light
- Details
- Written by Kevin Horton
- Hits: 3102
Progress has been frustratingly slow lately, due to time on the road, Christmas parties, Christmas shopping, other chores to catch up on, and a bit of laziness on my part. Yesterday and today I managed to get the first decent work sessions in several weeks. It felt good to make some progress that you can see.
I spent a while sitting in the cockpit in the dark, with a goose neck lamp powered with jumper cords. I figured out where I should mount it, and where to put the dimmer knob that controls it. Then I spent quite some time puzzling over how to make the various holes, before finally biting the bullet and grabbing the drill and Unibit. Of course I needed a 0.95" hole, and the Unibit only went to 0.875". So I had to finish off by carving it bigger with a Dremel tool. I drilled the holes for the dimmer, drilled and countersunk the platenut holes, primed the bare metal in the holes, then stopped for the day.
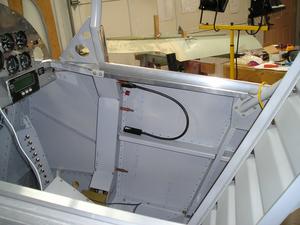 Today I installed the platenuts that hold the light mount, then did a test fit of everything. I mounted the dimmer transistor and heat sink on the back wall of the forward luggage compartment. I need to come up with some sort of clip to hold the end of the goose neck when it is not being used, and I have to run the wires.
The goose neck light will serve as a map light and a back up/supplementary instrument panel light. It lights up the whole panel very nicely if I bend it so it sits just ahead of my chest, facing forward.
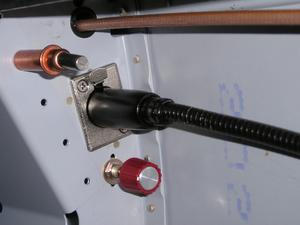 I need to shorten the dimmer shaft, as it sticks out way too far from the bulkhead. The lamp can be removed by pushing on the tab above the mount, so perhaps I'll remove it and store it in a side pocket for daytime flights.
Hangar at Carp - CYRP
- Details
- Written by Kevin Horton
- Hits: 3616
Awhile back I mentioned that I was considering getting a hangar at Carp, CYRP. I eventually decided to reserve one of the units in the set of T-hangars that were being built. I took possession in late November, and managed to sub-lease the unit to another pilot starting 1 Dec. He'll probably use the unit until I am ready to move the aircraft to the airport.
The hangar is well built, but I am not crazy about the choice in doors. The doors hang from tracks, and slid sideways to open. My unit has about a 5 inch gap between the bottom of the doors and the paved floor, and there is a about a two inch gap running vertically at each end where the doors slide out.
Today I went out to the hangar and cobbled together a mod to close the gap between the bottom of the doors and the floor. That'll keep most of the snow out this winter. Next summer I'll look at fitting some rubber strips to close off those vertical gaps.
I met up with John Perrin at the hangar - it turns out he has a unit diagonally behind mine. His RV-8 is ready for first flight as soon as he can get the final inspection done. He hopes to get over that hurdle early in the New Year. His will be the first flying RV-8 in the Ottawa area.
This evening I spent some time making up some paper cutouts to decide whether it is possible to get an RV-3 in the unit with my RV-8. A friend of mine is building an RV-3, and we have talked about sharing a hangar to cut costs. It looks like the only way to fit them both in is if I arrange to knock down the partition between one corner of my T and the end of the hangar. Then we could get both planes in, but the front one would have to come out to get the back one in or out. We'll make a decision about this after both aircraft are flying.
Instrument Lighting Puzzle
- Details
- Written by Kevin Horton
- Hits: 3663
I spent a week on the road, then we had all my co-workers over for a big Christmas party, which pretty much ate up the weekend between the prep work, the party and the recovery. Last week I spent several days in Montreal, so I only got a bit of work done.
I did spend an hour sitting in the cockpit with the lights out in the garage, playing around with an LED flood light. I decided to use LED flood lights for the instrument panel lighting after my experience with the Diamond DA-20. The prototype originally had conventional internally lit instruments, which looked just wonderful as long as the canopy was open. But as soon as you closed the canopy you were faced with a sea of reflections in the windscreen. I did one night flight, but it was clearly not an acceptable situation, as the reflections greatly hindered the ability of the pilot to discern lights on other aircraft and the ground. Diamond went back to the drawing board, and came up with a scheme that used three white LED flood lights illuminating the instrument panel. It didn't look as pretty, but it was much more functional, as the even lighting was much less prone to causing reflections in the windscreen.
So, for my RV-8 I decided to go with LED flood lights. I figured they should work acceptably well, be cheap and simple, and should avoid any problems of reflections in the windscreen. I had seen several RV-8s that had LED flood lights mounted in the lightening holes on the canopy bow/roll bar assembly. I used some alligator clips to temporarily power an LED flood light from Van's. I was dismayed to see that the planned location was too close to the panel, and the light had to hit the panel at a very oblique angle, which tended to put large areas of many instruments in shadows. I'll need to find mounting locations further aft to try to get the light hitting the panel at closer to 90°. I also noted that the automatic lighting intensity control of the Garmin GNS-430 and GTX-327 caused them to crank up the display and backlighting when the flood light shown on them. I will probably have to add a dedicated dimmer control for those two boxes.
Last night I started manufacturing small brackets to mount two LED lights.
In retrospect, I'm not sure I made the right decision to go with LED flood lights. It is quite possible that the RV-8 glareshield would adequately prevent reflections form internal instrument lighting. On the other hand, I don't plan to do very much night flight, so I can get by with an adequate system. And perhaps I could argument the LED flood lights with an under-glareshield flood light system, such as those sold by Aero Enhancements or Superior Panel Technology.
Care and Feeding of Lycomings
- Details
- Written by Kevin Horton
- Hits: 7194
Eustace Bowhay has a vast amount of experience operating piston engines - he flew professionally for decades, and amassed tens of thousands of flying hours. He has learned a lot over the years, and occasionally offers his Pearls of Wisdom on the RV-List. I was recently reminded of this RV-List posting that he made back in 1999. The following recommendations for piston engine operation are posted with his permission. You can find more gems from Eustace Bowhay at the Van's Air Force - Western Canada Wing
From: "Eustace Bowhay"
Subject: Engines-Care and feeding of Lycomings
Date: Jan 19, 1999
After getting out of the air force in 1945 I became a part owner in a small charter and flying school operation and continued to be involved in commercial aviation until retirement. With the switch from the air force paying the bills to me paying them I really got interested in how my engines were being handled. It didn't take long to see the difference in costs between the engine that was carefully handled and one that was handled by an inexperienced pilot or hot rodder.
My priorities have always been safety first and costs second, and over the years it became very plain that the best and cheapest way to accomplish this was to start out with a new engine or a premium overhaul and don't cut corner's under the cowlings. After a few years finally settled on the following procedures and found them to do the best job.
Slow Progress
- Details
- Written by Kevin Horton
- Hits: 3445
It's been a busy week, but unfortunately not enough of the busyness was spent in the garage.
I spent a lot of time running the strobe light and position light wiring, and working on the wire bundles under the baggage compartment and cockpit floors. I held off on creating the wire bundles until the vast majority of the wires were in place.
I had a depressing realization a few days ago - I had spent hours running the strobe light and position light wiring in the rear fuselage, and I just realized that I need to run the pitch trim wire in the same bundle. So I get to spend another few hours cutting the wire tires, running the pitch trim wire and making up the wire bundle again. And the bruises had almost disappeared from my arms where I beat the heck out of them against the bulkheads worming my way into the aft fuselage.
I'm getting ready to head to Wichita on Friday to do some King Air simulator training this weekend, and then a bunch of Global 5000 flight testing. So, I won't make a lot more progress before Christmas. :(
