Wing Main Spar
- Details
- Written by Kevin Horton
- Hits: 3376
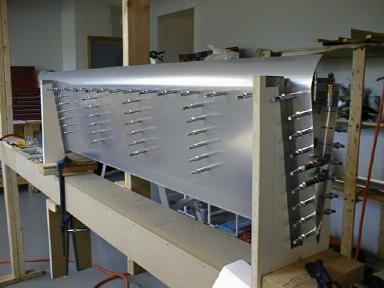
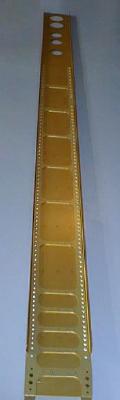 Here is the right wing main spar. The inboard end is at the bottom of the picture. The rear of the spar is visible in this view.
It comes gold anodized and all assembled. It is practically a work of art, with the gold finish and beautifully done riveting. Unfortunately Terry won't let me hang one on the wall.
The spar is assembled from four pieces. The heart of it is a 1/16 inch thick "C" shaped channel. On the rear side there is a waffle plate that reinforces it.
The outboard end (top of the picture) doesn't carry much load, so the waffle plate only goes to about 3/4 span, and there are lightening holes near the wing tips.
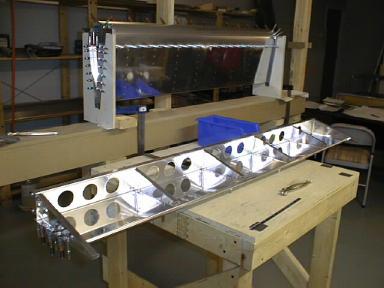
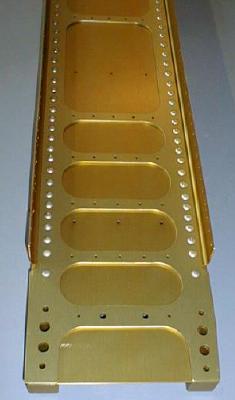 Here is a close up of the waffle plate at the inboard end.
The small holes with no rivets in them will be used to rivet the wing ribs too later.
The big holes at the inboard end (bottom of the picture) are for the bolts that attach the wing to the fuselage.
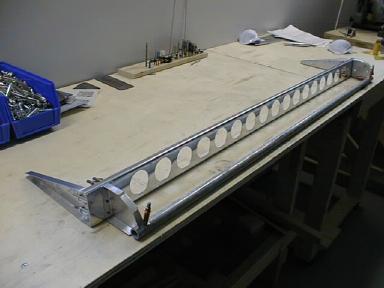
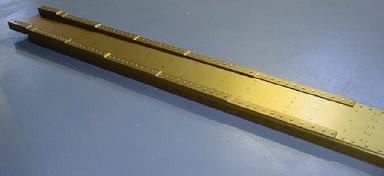 Here the spar has been turned over to show the front side.
You can see the large bars that reinforce the top and bottom edges. These bars get thinner as they go outboard because the biggest bending loads are at the inboard end.
Ailerons riveted
- Details
- Written by Kevin Horton
- Hits: 3102
Well, my trip got delayed by two days, so I finished riveting both ailerons today. I will head to Wichita tomorrow.
Completed flaps
- Details
- Written by Kevin Horton
- Hits: 3193
Here are the completed flaps. I finished the left one last night, and the right one today.
I have been building both flaps in parallel. After I do a step on one flap, I do the same step on the other. This saves a lot of plans reading and setup time.
 The left aileron can be seen in the jig in the background. I will start riveting the skins to the skeleton the next work session.
The step ladder visible in the background is used to hang a plumb bob from to make sure that the ends of the aileron and flap jig are vertical. This makes sure that the surfaces are built without a twist in them.
I made good progress on the two weeks of vacation that I just finished. It looks like I am heading back on the road for two weeks, so the project stops again.
Flap in Jig
- Details
- Written by Kevin Horton
- Hits: 3402
Here is the right flap in the jig after I drilled all the rivet holes. The left flap was at this stage yesterday.
 I have to deburr and dimple the holes, prime everything, fabricate the mount for the flap control rods, and then I can rivet it all together.
I'm on two weeks of vacation right now, so I am making reasonable progress. I hope to have the ailerons and maybe the flaps riveted by 9 August.
Aileron and Flap
- Details
- Written by Kevin Horton
- Hits: 3397
In the background you can see the right aileron in the jig after drilling the rivet holes. The left aileron was at this stage yesterday.
I have to deburr and dimple the holes, prime the front skin and the end ribs, and then I can rivet the ailerons together.
 The left flap bottom skin, spar and ribs can be seen on the table, after drilling and clecoing them together.
Off the right rear, you can see the plans sitting on a desk.
The shelves used to store parts are visible behind the aileron.
At the left rear you can see the air line coming down from the garage. The air compressor is in the garage, and I put a piece of copper pipe through the wall to bring the air inside.
Aileron Skeleton
- Details
- Written by Kevin Horton
- Hits: 3955
The normal construction sequence is to build the main wing structure, then the fuel tanks, and finally the ailerons and flaps. I decided to start with the ailerons and flaps so that I could delay any work on the main wing structure. The fatal accident of RV-8 N58RV was caused by an in-flight separation of one of the outboard wing sections, so I wanted to wait until the accident investigation was complete before doing any work on parts that might see a design change.
 Here is the skeleton of the left aileron all clecoed together.
Now I have to do is deburr the parts, prime all the parts for both ailerons, and then I can rivet the ailerons together.
Unfortunately, I am heading back on the road again, so nothing more will happen for a week or so.
Note - The N58RV accident investigation eventually put my concerns to bed - an extensive engineering review and static testing by outside consultants showed that the wing structure as designed is adequate.
